
stealth cam set up instructions
Setting up a Stealth Cam involves app downloads, account creation, and initial programming for optimal performance. Understanding these steps ensures successful wildlife monitoring.
Understanding Trail Camera Basics
Trail cameras, like Stealth Cam models, are remotely operated devices used for capturing images or videos of wildlife. They utilize Passive Infrared (PIR) sensors to detect motion, triggering the camera to record. Understanding these core components is crucial for effective setup.
Key features include image resolution (measured in megapixels), video quality (e.g., 1080p), and detection range – the distance at which the camera can sense movement. Cellular models require a SIM card and data plan for remote image transmission via the Stealth Cam COMMAND PRO app. Battery life is also a significant factor, influenced by usage frequency and temperature. Familiarizing yourself with these basics will streamline the installation and customization process, maximizing your scouting efficiency.
Benefits of Using a Stealth Cam

Stealth Cam offers numerous advantages for wildlife observation and property monitoring. Remote scouting saves time and effort compared to traditional methods, allowing you to assess animal activity patterns without disturbing the environment. Cellular connectivity provides instant image delivery to your smartphone via the COMMAND PRO app, enabling real-time insights.
Furthermore, these cameras aid in understanding animal behavior, identifying trophy animals, and monitoring property security. The adjustable PIR sensitivity and coverage distance optimize detection, minimizing false triggers. High-resolution images and videos provide detailed information, while durable construction ensures reliable performance in various weather conditions. Ultimately, a Stealth Cam empowers informed decision-making for hunters, landowners, and wildlife enthusiasts.
Preparing for Installation
Proper installation requires careful location selection and gathering essential tools like mounting straps, ensuring optimal camera performance and secure placement for reliable data.
Choosing the Right Location
Selecting the ideal location is paramount for successful wildlife monitoring with your Stealth Cam. Consider game trails, feeding areas, or locations with frequent animal activity. Ensure the camera faces the target area, avoiding direct sunlight which can cause glare and wash out images.
Look for a relatively clear field of view, minimizing obstructions like branches or dense foliage. The height of the camera should be appropriate for the animals you’re targeting – typically between 3 and 5 feet off the ground.
Think about security; choose a spot less accessible to potential theft or tampering. Finally, verify cellular signal strength (for cellular models) before permanently mounting the camera, ensuring reliable data transmission.
Gathering Necessary Tools & Accessories
Before installation, assemble essential tools for a smooth setup. You’ll need batteries – check your camera’s specifications for the correct type and quantity. An SD card is crucial for storing images and videos; ensure it’s compatible and has sufficient capacity.
Mounting straps are vital for securing the camera to trees or posts. A small screwdriver might be needed for accessing battery compartments or adjusting settings. Consider a security box or cable lock to deter theft, especially in public areas.
For cellular models, verify your Verizon SIM card is active and has adequate data. Finally, have the Stealth Cam COMMAND PRO app downloaded and ready on your smartphone or tablet.

Initial Camera Setup
Begin by installing batteries and an SD card, then power on the device. Initial programming involves setting the date, time, and desired image/video settings.
Battery Installation
Proper battery installation is crucial for your Stealth Cam’s performance. Open the battery compartment, typically located on the camera’s rear panel. Insert the required number of batteries, adhering to the polarity markings (+ and -) inside the compartment. Most models utilize AA batteries, but confirm the specific type in your user manual.
Ensure batteries are fresh and of the same brand for consistent power. Avoid mixing old and new batteries. After inserting, securely close the battery compartment door to protect against the elements. Incorrect battery installation can prevent the camera from powering on or cause erratic behavior. Always double-check the battery compartment latch for a tight seal before deployment.
SD Card Insertion & Formatting
Inserting an SD card is essential for storing captured images and videos. Locate the SD card slot, usually near the battery compartment. Gently insert the SD card until it clicks into place; do not force it. Ensure the card is compatible with your Stealth Cam model – check the user manual for supported capacities.
Formatting the SD card within the camera is highly recommended. This ensures optimal performance and compatibility. Navigate to the formatting option in the camera’s menu settings. Formatting erases all existing data, so back up any important files beforehand. A formatted SD card minimizes the risk of corrupted images or video files, guaranteeing reliable data storage throughout your scouting endeavors.
Powering On & Initial Programming
Powering on your Stealth Cam typically involves a dedicated power button, often located within the battery compartment or on the camera’s side. Once powered on, the camera will guide you through initial programming steps. This usually includes setting the date, time, and potentially location information.
Initial programming is crucial for accurate data tagging. Carefully follow the on-screen prompts, using the camera’s buttons to navigate the menu. Setting the correct date and time ensures accurate timestamps on your images and videos. Some models allow for location settings, aiding in organization. Proper initial programming establishes a solid foundation for effective wildlife monitoring and data analysis.
Stealth Cam COMMAND PRO App Setup
The COMMAND PRO app facilitates remote camera control, image management, and account setup for seamless integration with your Stealth Cam cellular device.
Downloading & Installing the App
Initiating the setup requires downloading the Stealth Cam COMMAND PRO application onto your smartphone or tablet. This app serves as the central hub for controlling and accessing data from your camera. You can find the app readily available on both major app stores: the Google Play Store for Android devices and the iOS App Store for Apple iPhones and iPads.
Simply search for “Stealth Cam COMMAND PRO” within your respective app store. Once located, tap the “Install” button. The app will then automatically download and install onto your device. Ensure you have a stable internet connection – preferably Wi-Fi – during the download process to expedite the installation and prevent potential interruptions. After installation is complete, locate the app icon on your home screen and tap it to launch the application.
Creating a Stealth Cam Account
Upon launching the Stealth Cam COMMAND PRO app, you’ll be prompted to create a new account. This account is essential for linking your camera and accessing its captured images and videos remotely. Tap the “Create Account” or “Sign Up” option, typically found on the app’s welcome screen.
You will then be guided through a registration process, requiring you to provide a valid email address and create a secure password. It’s crucial to use an email address you regularly check, as Stealth Cam may send important notifications or verification links to it. Follow the on-screen instructions, agreeing to the terms and conditions. A verification email might be sent to your provided address; follow the link within to activate your account before proceeding to log in.
Connecting Camera to the App (Cellular Models)
With your account established, the app will guide you through connecting your cellular-enabled Stealth Cam. Initiate the connection process within the app, often indicated by a “+” or “Add Camera” button. The app will likely request the camera’s unique IMEI number, usually found on a sticker affixed to the camera itself or within the battery compartment.
Enter the IMEI carefully, ensuring accuracy. The app will then communicate with the camera via the cellular network. You may need to activate the SIM card associated with your camera through your Verizon account (or relevant provider). Once connected, the app will display the camera’s signal strength and allow you to remotely manage settings and download images.
Mounting & Securing Your Stealth Cam
Secure mounting utilizes straps wrapped around surfaces, ensuring stability. Adjust PIR distance and camera angle for optimal coverage and desired field of view.
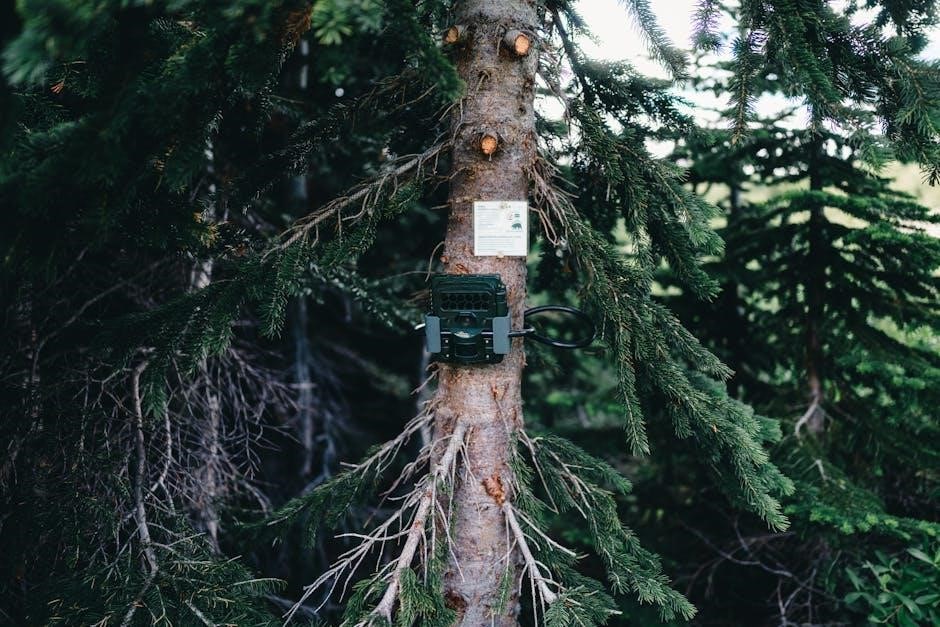
Using Mounting Straps
Mounting straps are a fundamental component for securing your Stealth Cam to trees, posts, or other suitable surfaces. Begin by inserting the strap through the designated slots located on the rear housing of the camera. Ensure the strap is threaded correctly to allow for a secure and stable hold.
Wrap the strap around the chosen mounting surface, positioning the camera at your desired height and angle. Carefully pull the strap tight, and utilize the provided nut and washer to firmly tighten it to the bottom of the camera. This prevents slippage and ensures the camera remains in place, even in challenging weather conditions. Regularly inspect the straps for wear and tear, replacing them as needed to maintain optimal security.
Adjusting PIR Coverage Distance
PIR (Passive Infrared) sensors detect motion, triggering your Stealth Cam to capture images or videos. Many Stealth Cam models offer adjustable PIR coverage distances, allowing you to customize the camera’s sensitivity to movement. This feature is crucial for optimizing performance based on your specific environment and target area.
A shorter PIR distance reduces false triggers from small animals or vegetation movement, conserving battery life and SD card space. Conversely, a longer distance increases the detection range, ideal for larger areas or capturing distant activity. Consult your camera’s manual to locate the PIR distance settings and adjust accordingly. Experiment with different settings to find the optimal balance between detection range and minimizing unwanted recordings.
Optimizing Camera Angle & Field of View
Achieving the best results with your Stealth Cam requires careful consideration of the camera’s angle and field of view. Position the camera to face the area of interest, ensuring the target zone falls within the sensor’s detection range. Avoid aiming directly at the sun, as this can cause glare and wash out images.
Experiment with slight adjustments to the angle to maximize coverage and minimize obstructions like branches or foliage. The field of view determines how wide an area the camera captures; wider fields are suitable for broad landscapes, while narrower fields focus on specific trails. Securely mount the camera to prevent movement from wind or animals, maintaining the desired angle for consistent monitoring.
Advanced Settings & Customization
Fine-tune your Stealth Cam by adjusting date, time, location, image resolution, and PIR sensitivity for personalized monitoring and optimal performance.
Date, Time & Location Settings
Accurate date and time stamping are crucial for organizing and analyzing your trail camera images and videos. Within the Stealth Cam’s programming menu, navigate to the date and time settings. Ensure these are correctly configured to reflect your current location and time zone. Incorrect settings can lead to misinterpretation of event timings.
Some Stealth Cam models also offer the ability to set the geographical location. This feature, often accessed through the COMMAND PRO app, allows you to tag images with GPS coordinates. This is particularly useful for larger properties or when managing multiple cameras. Properly configured location data enhances the overall value of your scouting efforts, providing precise information about animal movement patterns and activity hotspots.

Image & Video Resolution Settings
Optimizing image and video resolution is key to balancing file size and image clarity. Stealth Cams typically offer various resolution options, ranging from lower resolutions for extended recording times to higher resolutions for detailed images. Consider your scouting goals when making this selection.
Higher resolutions (like 26MP for photos or 1080p for video) capture more detail, ideal for identifying animals at a distance. However, they consume more SD card space and battery life. Lower resolutions are suitable for general monitoring where precise detail isn’t critical. Experiment with different settings to find the best balance for your specific needs and available resources. The COMMAND PRO app often provides a preview of the selected resolution.
PIR Sensitivity Adjustment
Adjusting the Passive Infrared (PIR) sensitivity is crucial for minimizing false triggers and maximizing battery life. The PIR sensor detects motion, but factors like wind, sunlight changes, or small animals can cause unwanted recordings. Stealth Cam offers variable PIR distance settings to address this.
Lowering the sensitivity reduces the detection range, ideal for areas with lots of activity close to the camera. Increasing sensitivity expands the range, suitable for larger areas or shy animals. Many models feature a test mode to help determine the optimal setting for your location. Regularly check your images and adjust the PIR sensitivity as needed to achieve the desired balance between detection and false triggers. This ensures efficient scouting.